Hello everyone!
Today I wanted to announce the winners of the two giveaways I've had open. First, the winner of the Studio D Boutique "So Tinsel" stamp set, from my YouTube video giveaway is…………………… Stephanie Riddle Rogers!!!!!! Congrats!!!
Second, the winner of my Christmas giveaway here on my blog is…………….Nathalie Colon!!!!!!!!!!
Congratulations ladies!!!
Please send me a private message on Facebook (you can find me there as Sharon SMscrapper) with your contact information, so I can get your goodies out to you!!!
Thanks so much for participating everyone!
The holidays are truly here, and I'm still rushing to buy all the presents I need to get. Usually by this time everything is all wrapped and ready to go, but with all this moving situation, unpacking has taken over my life! Just today I unpacked about 9-10 jumbo sized boxes! Little by little, my garages are looking more and more de-cluttered. Lots of work still to be done, but I'm happy it's getting done.
Hope everyone has a happy and safe Christmas Eve and Day!
Merry Christmas!
Wednesday, December 18, 2013
Saturday, December 7, 2013
LSG & 7 Dots Studio Creative Hop!
Welcome to LSG & 7 Dots Studio Creative hop!
We are so excited to have two amazing companies team up for a full day of creativity. This hop will surely get your creative juices flowing, so head on over to all these incredibly talented crafters to check out how they've combined the beautiful lines by 7 Dots Studio, with Lindy's Stamp Gang products. It's a match made in color heaven!
We have a little surprise for you!
We would love for you to show some love to all the crafters, and leave them a little message. You will have the opportunity to win a fabulous prize by both 7 Dots Studio, and Lindy's Stamp Gang, so please let us know that you have done, so by going back to the 7 Dots Studio, and Lindy's Stamp Gang blog at the end of the hop.
Here is a full list if you get lost along the way:
Mary - http://damselofdistress.blogspot.ca
Tusia- www.ototusia.blogspot.com
Lizzy - http://lizzywurmann.typepad.com
Erin- http://erinblegen.blogspot.com/
Limor - http://chicscrapbookdesigns.blogspot.ca
Helen - http://helentilbury.blogspot.ca
http://smakizycia-wiosanka.blogspot.com/
Nolwen- http://inner-voices.net
Irina- http://irinagerschuk.blogspot.ru/
Cindy- http://cynthialoowho.wordpress.com/
Sandi- http://sandi-smith.blogspot.com/
Lynne- http://damselofdistress.blogspot.ca
Kate - http://www.sparkletart.com
Ivett - http://www.ivettcarrillo.blogspot.ca
Sharon - http://www.smscrapperdesigns.blogspot.com (YOU ARE HERE)
Here's what I created for the hop:
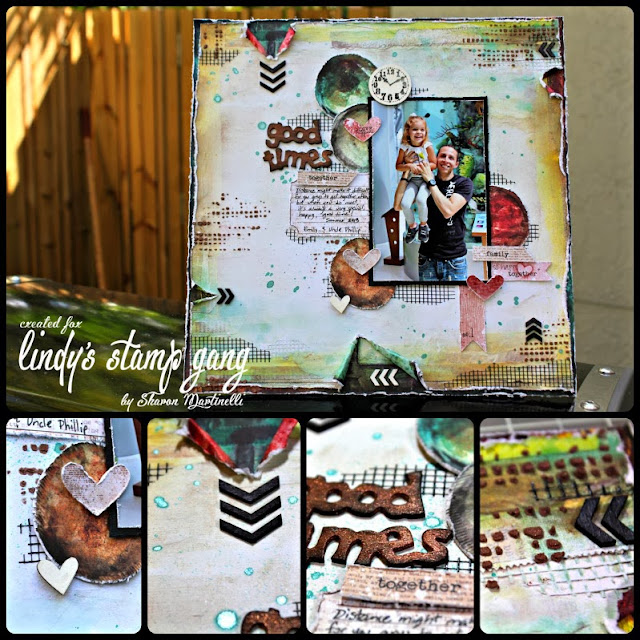

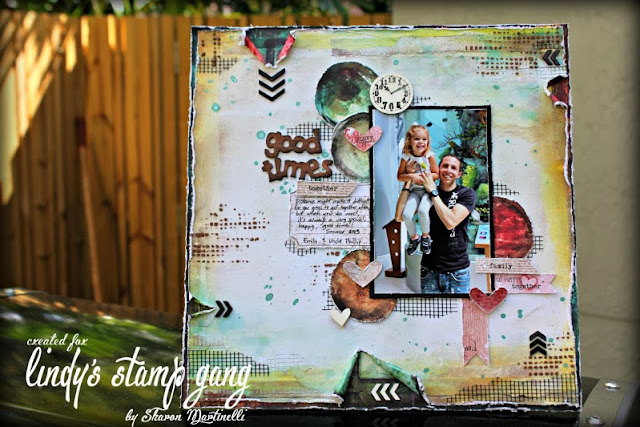 I have a video tutorial on my YouTube Channel, where I show step by step what I did, and what products I used to create this layout. You can go and check out that video by clicking HERE.
The products I used were: Magical Mica in Deep Burnished Bronze, Starburst Stains in Incandescent Copper, Creme Brûlée Cream, Shabby Turbine Teal, and Toto's Tornado Black.
Remember to click on the blue button on the top right of this post where it says "Join this site" so you can be one of the first to know when a new blog post is up. Also, check out the previous post to enter another Christmas giveaway I'm hosting (My YouTube giveaway for the 'So Tinsel" stamp set) is also still open, so check it out to participate in that too!
Yes, I've been doing quite a bit of giveaways lately, I just love getting happy mail out to you guys! Hope you enjoyed today's post, and were inspired. Thanks so much for stopping by, and Happy Holidays!!!
Friday, December 6, 2013
Finally, my blog Christmas Giveaway!
Hi everyone!
All you have to do to be eligible to win is, make sure you follow this blog (to become a follower, just click on the button on the top right side of this post where it says "Join this site", and leave a comment on this blog post, telling me, what your favorite Christmas tradition that you take part in your house is.
If you'd like to participate in the other Christmas giveaway that's going on my YouTube Channel, where I'm giving away Studio D Boutique's "So Tinsel" Stamp set, check out the video HERE, so you can get in on it, as it is still open. All the rules on that particular giveaway are disclosed on that video.
Thanks so much for all your support this year as I've been quite busy with life, specially in the last few months, and have not posted as much as I'd like. I appreciate each and every one of you, and will continue hosting more giveaways like I've always done. It's really fun sharing!
Hope you all have a fantastic holiday season, and check back here tomorrow, for another chance to win some awesome prices. Yes, the giving keeps on!
Thanks again for stopping by, and take care!
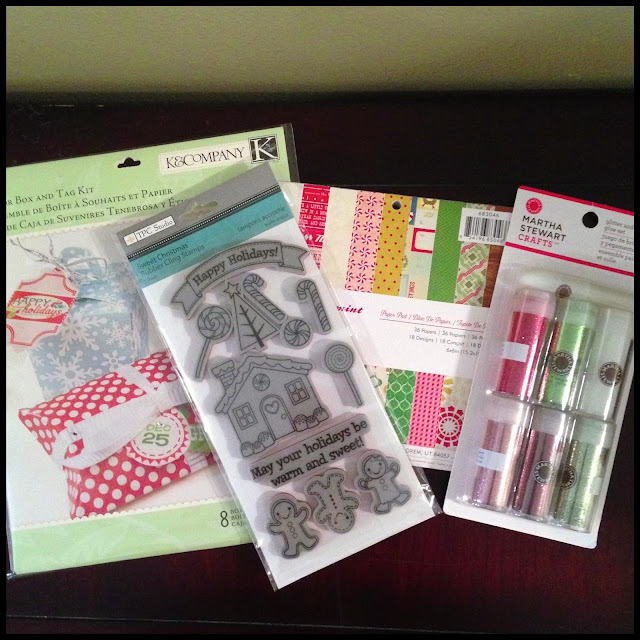
I hope you have all been enjoying the beginning of the holiday season. Today, as promised for quite a few weeks now, I wanted to share a little giveaway here on my blog. I know I've been doing quite a bit of giveaways lately, mostly on my YouTube Channel, but I've been promising one on the blog for a while, and have not been able to get to it until now. Without further a dew, here's a picture of what I'll be giving away this time: Gift Box and Tag Kit by K& Co., Christmas Stamp set by TPC Studio, 6x6 Christmas themed paper pad, and a set of Christmas themed Martha Steward Glitters.

All you have to do to be eligible to win is, make sure you follow this blog (to become a follower, just click on the button on the top right side of this post where it says "Join this site", and leave a comment on this blog post, telling me, what your favorite Christmas tradition that you take part in your house is.
If you'd like to participate in the other Christmas giveaway that's going on my YouTube Channel, where I'm giving away Studio D Boutique's "So Tinsel" Stamp set, check out the video HERE, so you can get in on it, as it is still open. All the rules on that particular giveaway are disclosed on that video.
Thanks so much for all your support this year as I've been quite busy with life, specially in the last few months, and have not posted as much as I'd like. I appreciate each and every one of you, and will continue hosting more giveaways like I've always done. It's really fun sharing!
Hope you all have a fantastic holiday season, and check back here tomorrow, for another chance to win some awesome prices. Yes, the giving keeps on!
Thanks again for stopping by, and take care!
Sunday, December 1, 2013
Nontraditional Colored Ornament- LSG December Color Challenge
Hey everyone!
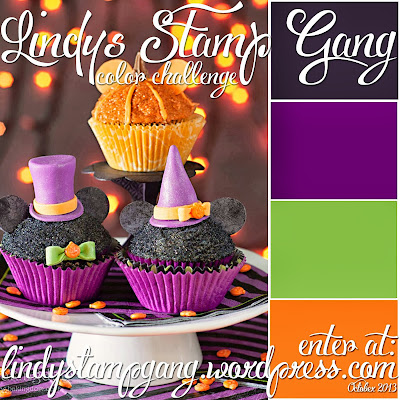
Today I come to you with my inspiration piece for the December Lindy's Stamp Gang Color Challenge. Last month, there were three lucky winners who received $50 gift certificates. Will this month be your month? I hope you can join in on the fun!
This month's color challenge inspiration picture is the following:

Beautiful rich colors, festive and vibrant. I created a paper ornament using several of Starburst Stains: Open Arms Amethyst, Heliotrope Purple Plum, and Time Travel Teal. It was extremely fun and easy to make using Tim Holtz Rosette dies, and some gold doilies I had in my stash.


For more info on how to enter, just visit the Lindy's Stamp Gang Blog and have fun creating!
Wednesday, November 27, 2013
Winter Card- Joy
Hello everyone!
Winter is finally here, and today I wanted to share with you a card perfect for this time of the year. I used several Lindy's Stamp Gang embossing powders on top of the wood veneers I used and I loved the look.
The wood veneer trees I got at my local Michael's, and I embossed them using Magic Moon Pearls embossing powder. Love the pearlescent finish with the peak of the wood tone in the background. The snowflakes are Maya Road wood veneers, that I embossed using Madonna Robe Blue Gold embossing powder. I also embossed a tiny bird you can see peeking on top of the white Prima resin birdhouse. It is a Studio Calico wood veneer that I embossed using Bougainvillea Red Teal embossing powder, so pretty!
I used 7 Dots Studio Paper for the background, a doily, and a sticker word from Pebbles ink. Super dimensional card, I hoped you liked it!


Friday, November 1, 2013
Gratitude is and Action Word
Hello everyone! November is here! Can you believe it? I sure can't! Seems like the days are flying by and sooner than we know it Christmas will be around the corner.
As you know, I've been quite the busy bee lately and I promised I would share as soon as I could why. Well, this is it. I've been totally busy handling the sale of our house, and also the purchase of a new house. We are moving!!! and far!
Totally stressful and crazy process, but we are finally reaching the goal, as we have sold our house, and just bought a new one! So I'm up to my neck with stuff to do, packing, getting things finalized and well, I'm totally exhausted lol. I've been having quite a bit of giveaways on both my YouTube Channel, and my Instagram, so I've been also taking care of those, and I have been promising to do one on here, and hope to so asap. Been promising it for a while, but time has just gotten away from me guys. Hope you can bare with me. Just keep a look out, because IT IS happening lol.
Today, I wanted to share with you what I created as inspiration for the Lindy's Stamp Gang November Color Challenge. If you don't know about them, please go check out their blog HERE. We do challenges every month, and the designers always have great inspiration for everyone to draw from. I love how our team is so creative! We always share a variety of different projects for all different tastes. Go check out the blog, you will NOT be dissapointed.
Here is the inspiration photo for this month. Isn't that truck just adorable?!

Here's what I created:

The products I used where the following:
Starburst Stain-Bayou Boogie GoldStarburst Stain- Shabby Turbine Teal
Embossing Powder-Terra Cotta Rust
Embossing Powder- Caesar's Gold
Hope you enjoyed and thanks for stopping by today!
Wednesday, October 23, 2013
Hello Friend Card Tutorial
Hello friends!
Today I wanted to share a card I made using my favorite Lindy's Stamp Gang embossing powders. If you are a follower, you know I love using their embossing powders, and I have been for years. I love their two toned effect. and I feel they give an extra special touch to all the projects I use them in.
For this card, I used the Glitz Spritz in Cactus Gold, and three different embossing powders: Imperial Crown Purple Gold, Midnight Copper, and Oakleaf Olive Gold.
I loved the way these looked together, and hope you enjoy watching the process video at the end of this post.

Saturday, October 19, 2013
Preview Sale Video!!!
Hi everyone!
Just wanted to share a preview of what's going to be on sale on Blitsy.com starting Monday, Oct 21st. You know I love sales, and discounted prices, so it was wonderful when Blitsy contacted me to share this information with you. Lots of great stuff going on sale, so check the video out to see if any of your wish list items will be offered at a great price!Remember there are limited amounts of products at discounted prices so don't miss out by waiting too much to get to the site as soon as the sale starts.
To take advantage, become a member for FREE by clicking HERE.
Thanks so much for stopping by, and yes I have NOT forgotten about the giveaway I promised for the blog. I will be getting that together in the next couple of days, it's just been crazy busy around here!
Luv you guys!
Have a great weekend!
Tuesday, October 1, 2013
October Color Challenge with Lindy's Stamp Gang!
Hello friends!
Yes, I am still alive and kicking LOL! I truly apologize, because I know I haven't been present on the blog as much as I'd like to, for quite a while now. Basically, I have been extremely consumed both mentally, physically, and emotionally with a lot I have going on around here............ definitely lots going on around here (don't worry, it's nothing bad), but once things become a little bit more concrete, I think I'll feel comfortable sharing. Until then, please know I'm still around, you can keep track of what I'm up to through my YouTube channel, or my Instagram account, but until I'm more specific, just know, I really haven't had enough time for crafting, because I've been involved with a lot of things at home. My mojo has definitely suffered, as I have not been crative for quite a bit now, BUT, I made this cute card as an inspiration piece for the Lindy's Stamp Gang october Color Challenge. I've been designing for Lindy's Stamp Gang for several years now, and I cannot tell you how much I enjoy using the products.
This month's Color Challenge uses a color combo a barely use, so it was extra challenging for me, but in the end, I'm happy with the result: a simple card with tons of texture.


Take a look at all the other inspiration pieces by the other design team members, and head on over to the Lindy's Stamp Gang Blog to participate in the challenge.
Products used:
Glitters in Petrified and Purple Rain
Thanks for stoping by the blog today, and stay tuned for a giveaway coming soon (hopefully this weekend or sometime next week!)
Thursday, September 5, 2013
Mad Hatter Blog Hop!
Hello everyone!
Have you seen all the new goodies available at the Lindy's Stamp Gang store recently! Well, if you haven't, here's a little peek!
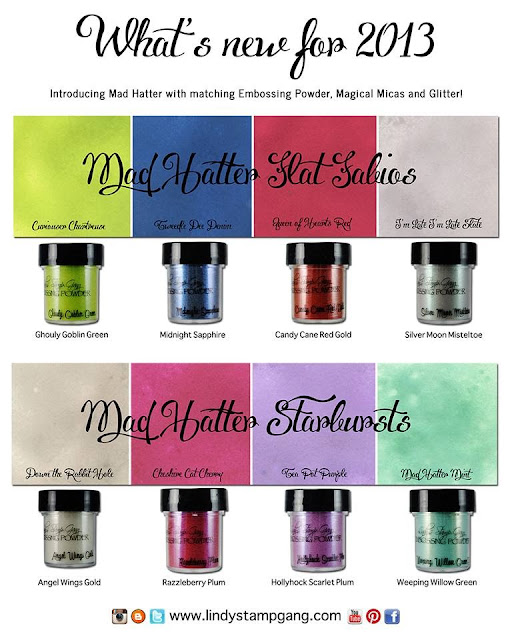
Have you seen all the new goodies available at the Lindy's Stamp Gang store recently! Well, if you haven't, here's a little peek!

I totally love all those vibrant colors, don't you?
Well, I wanted to let you know that in honor of the new releases, there is currently a blog hop going on, featuring some of the lovely designers whom I'm very honored to work with, on the Lindy's Stamp Gang's DT.
I don't know if you've had the chance to meet all of the designers yet, since many of them have joined our team just recently, but this Blog Hop is a great way for everyone to hop on over to their blogs, get some inspiration, and show them some love. Want to join in the fun? They've been hard at work with the new products, and their creations are sure to inspire you. Head on over to the Lindy's Stamp Gang blog at http://lindystampgang.wordpress.com and check out the line up. You are sure going to have some fun!
Monday, September 2, 2013
Mature and Girly Birthday Card
Happy Labor Day everyone!
Today, I wanted to share with you my inspiration piece for the Lindy's Stamp Gang's September Color Challenge. Every month, LSG puts out a great color combo to inspire, and all the design team members have a lot of fun playing around to show different interpretations of the inspiration picture. This month the inspiration piece was the one below.


I used two different LSG embossing powders in this card: Oak Leaf Olive Gold and Magic Moon Pearls. I also used a few Starburst Stains: Green With Envy Green, Tea Pot Purple and Cosmopolitan Pink. I have a detailed video tutorial on my YouTube Channel, on how I created this card, and in it, you can see how all the materials went from being white, to being colorful and shimmery.
This is a perfect birthday for a mother, a grandma and even your mother in law. Girly, elegant, yet colorful and full of dimension.
Lindy's Stamp Gang is having a Labor Day Sale! Get 25% off of everything using the code:laborday
Hope you enjoyed!
Stamps used: Dogwood by Hero Arts, Lace Background by Hero Arts, Raindrop Background by Hero Arts, and Stampin' up Netting Stamp.
Monday, August 19, 2013
Konad M95 Review
Hi everyone!
Hope you all had a great weekend!
If you know me, you know I love stamping, and when talking about nails, it is not out of the question. Such fun, and intricate designs can be attainable by just doing a little stamping on your nails. It's quick, and much easier than you might imagine.
I always love experimenting with my nails, so when I saw this plate, I knew I had to try it. Can you guess why? Well, of course, it has an owl on it!!!
So this is what the new Konad M95 Plate looks like:


For this first picture I used L'oreal's Haute Couture Red, and for the stamping Essie's Good as Gold. I have discovered that I don't always need to use special polish to stamp my nails. Metallic polishes seem to work really well too.


One thing I will say however, is that you need to be careful when wipping your plate before tranfering the design to your stamping tool. You don't want to remove a lot of the polish from the solid parts of the designs. I found this to be a little bit of an issue with the more solid designs on the plate, specially with the multiple hearts design. I found that I needed to be extra caredul just to get get an even looking stamped image. Overall, I think this is a super fun plate, with great designs. The possibilities with it are endless. I could layer that owl anywhere I tell ya'!
I have a tip for you too! My friends over at NailPolishCanada.com are holding a Nail Art Giveaway! The prize is for all 5 of the new Konad plates that have recently been released, and guess what? (Free shipping IS INCLUDED!
If you are interested in entering for a chance to win you can enter here: http://www.nailpolishcanada.com/categories/konad-nail-art.html
Thanks so much for stopping by the blog today, I hope you enjoyed my nail stamping post for today, and I encourage you to try some nail stamping. It's so fun!
Wednesday, August 14, 2013
Fluttering Butterflies
Hello everyone!
 I used many different Lindy's Stamp Gang Starburst Stains to make the background of the card, as well as the color on the butterflies. The method of applying color however, on those two things were completely different. I sprayed the background, and I painted the butterflies using a thin brush (two different methods of applying color, but both very effective). Can you see all the shimmer? I embossed the butterflies using black Versafine Ink, and Lindy's Stamp Gang embossing powder in Magic Moon Pearls, so the ebossing comes out black, but with a pearlescent finish. I love it! The pictures really don't do it justice.


 I added some Gold Stickles in some areas of the butterflies, specially the biggest one, just for some extra bling. I hope you enjoyed this card, as much as I did making it. Take care everyne, and have a safe end of the summer!
Summer is almost over, can you believe it?! My summer has been packed with tons of activities, and lots of cool little trips. I've definitely been busy, have you?
Now, all the talk is about back to school, and getting organized for the new school year. Everyone will be going back to their regular routines, and then barge into getting ready for the holidays! Amazing how time flies bye these days.
Today, I wanted to share with you this card I created using Lindy's Stamp Gang Products. When I look at it I see August...what I mean by that is, I usually envision the months in my mind having some sort of color theme, and to me, this is how August is, rich, colorful and super bright!


The Starburst Stains I used were the following: Wake Me Up Before You Go Gold, Pretty In Pink Pink, Ponderosa Pines Green, Fuzzy Navel Peach and Bayou Boogie Gold.

I used a Prima Stamp set as well as Hero Art's Antique Engravings Stamp set, for the butterflies. The Sentiment of the card is from and Inkadinkado Stamp set. The background resist was done using the Hero Art's Raindrop Background stamp, as well as the Magic Moon Pearls embossing powder from Lindy's Stamp Gang.
The white you see behind the butterflies, is a piece of white vellum which I dry embossed using a Stampin' up embossing folder, and glued down to the card using some paper lace from my stash.

Wednesday, July 31, 2013
A tag using Lindy's Stamp Gang and My Favorite Things Products
Hello there!
I'm so glad you are joining me back here again for another project share. Today I want to show you a tag I created using Lindy's Stamp Gang (LSG) products as well as My Favorite Things (MFT) Stamps. Today is the last day to take advantage of the code SMFRIENDS at the MFT store to get a 10% discount of your entire purchase. Sweet, huh?
This is a super colorful tag I made for the LSG's August Color Challenge. Every month, LSG Hosts a color challenge on their company blog, and all of the designers, share some inspiration for those who wish to participate. The challenge goes live at the beginning of each month and it's super fun to watch what everyone comes up with. Check out the LSG blog every beginning of the month to see how to enter, and be a part of it.
I used a stamp from the MFT's Distressed Background Blocks set, as well as some stamps from the Dandelion Wishes Set from MFT.
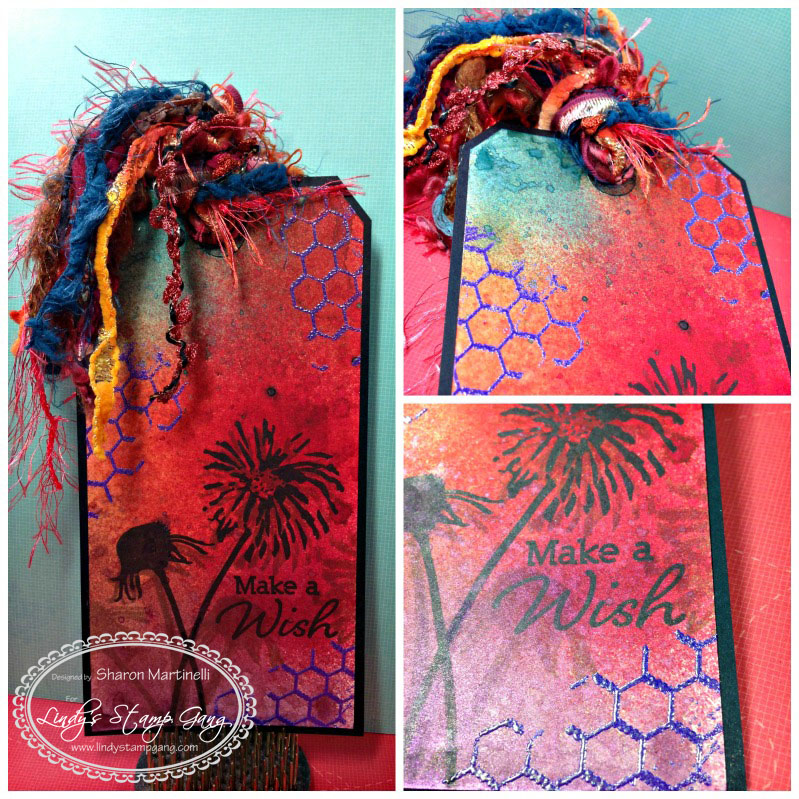
I used different LSG Flat Fabio Sprays, Starburst Stains, and on of LSG's fabulous embossing powders which I love. The Flat Fabios I used were: Tears on My Pillow Tangerine and Rizzo's Rowdy Red. The Starburst Stains I used were Open Arms Amethist and Tainted Love Teal. For embossing powder, I used the color Imperial Crown Purple Gold.
I added tons of fibers like I always do on all the tags I make, used MFT's Stamp Ink in the color Factory Green to create the shadows of the flowers behind the dark stamping of the flowers in my favorite black ink, which is Versafine.
Super colorful tag for a super fun color challenge. Remember to Visit the LSG blog for more details on how to enter, and take advantage of your 10% discount on the MFT Store using the Coupon Code: SMFRIENDS.
Thanks for stopping by. I hope you enjoyed today's project share!
Monday, July 29, 2013
Projects with My Favorite Things Stamps and Dies
Hello everybody!
Today I wanted to share with you a few projects I created using My Favorite Things Stamps and Dies. I have a coupon code you can use to get 10% off of your entire purchase. Just enter SMFRIENDS at checkout, and enjoy the discount. Right now they are also having a great sale on some of their stamps and dies, so you might want to check that out too. The discounted prices are great!
Anyways, lets get to the projects, shall we?
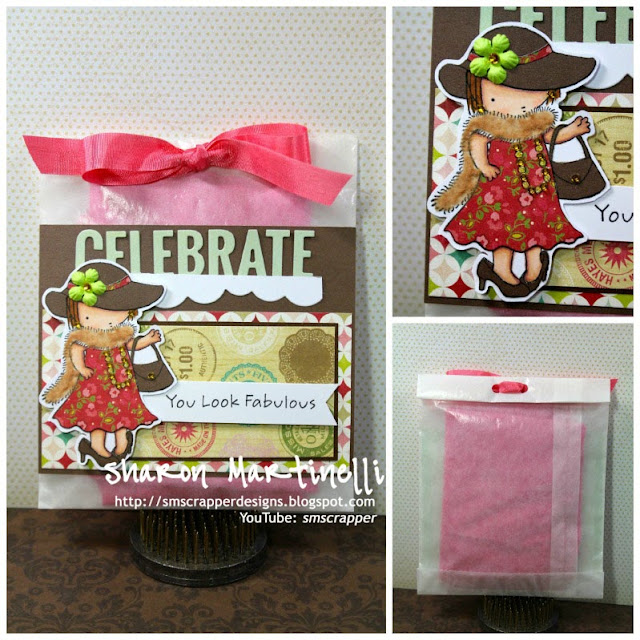
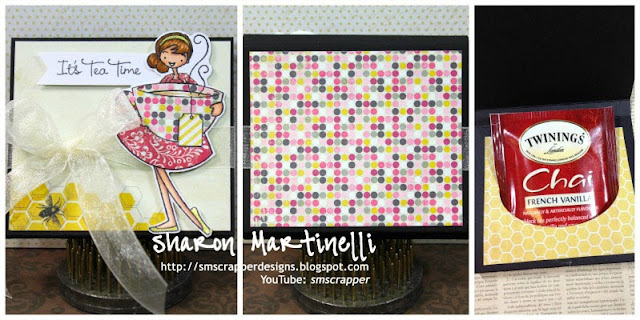
The first thing I made was this altered glassine bag. I used Echo Park's This and That Collection, which is super colorful. I stamped the MFT's Pure Innocence Dress up Diva Stamp, and used one of the sentiments of that stamp set as well. I also used some MFT Dienamics when altering this bag, specifically the Laina Lamb Design Dienamic Accent it- Celebrate die, and the MFT Dienamics Wonky Scallop Border. I cut the banner where the stamped sentiment is myself using my scissors. I colored the image using my Copic Markers, and I also did some paper piecing. To add a little bit more interest, I also added some gems and flocking to her outfit. She's totally a diva in my opinion, ha!
 The next thing I created was a card, using the Wendy Burns Design stamp set for MFT called You're so Special to me. the image is super whimsical, and I totally love her cuteness. I colored her with my Copic markers, and paper pieced her outfit, boots, and purse. I used the My Mind's Eye Collectable Unforgettable collection on this card, and also used two different MFT Dienamics Dies: Jumbo Cloud Stax , and the Farm Fence Die. Isn't she totally adorable? I love that image!
 Finally, I also made a cute Tea Holder, perfect to use as a gift favor, or just to add to a care package. In the picture below you can see the front, back, and inside of the holder I created using the MFT A la Mode Stamp You're my Cup of Tea. I used the My Minds Eye Honey Collection, as well as the MFT Dienamics Well Worn Greetings Die (the Oval die of the set). I used the die to create the opening where the tea bag is inserted in the holder.
Today I wanted to share with you a few projects I created using My Favorite Things Stamps and Dies. I have a coupon code you can use to get 10% off of your entire purchase. Just enter SMFRIENDS at checkout, and enjoy the discount. Right now they are also having a great sale on some of their stamps and dies, so you might want to check that out too. The discounted prices are great!
Anyways, lets get to the projects, shall we?
The first thing I made was this altered glassine bag. I used Echo Park's This and That Collection, which is super colorful. I stamped the MFT's Pure Innocence Dress up Diva Stamp, and used one of the sentiments of that stamp set as well. I also used some MFT Dienamics when altering this bag, specifically the Laina Lamb Design Dienamic Accent it- Celebrate die, and the MFT Dienamics Wonky Scallop Border. I cut the banner where the stamped sentiment is myself using my scissors. I colored the image using my Copic Markers, and I also did some paper piecing. To add a little bit more interest, I also added some gems and flocking to her outfit. She's totally a diva in my opinion, ha!


I really had a fun time working with all these products, and I have one more project to share with you in a few days from now. If you don't want to miss it, please remember to click the "Follow my Blogposts" button at the top right of this blog screen and be the first to know when a new post is up! Remember to take advantage of the sale, and the coupon code: SMFRIENDS for your discount.
Thanks so much for stopping by, and see you back here in a few days for another fun project. Have a great day!
Thursday, July 11, 2013
BLOG HOP: Basic Grey, Glue Dots, and Lindy's Stamp Gang
Hi everyone!
So happy you can join us today for this super exciting Blog Hop brought to you by Basic Grey, Glue Dots, and Lindy's Stamp Gang products.
 I had a super fun time creating my project, and I can't wait to see what all the other designers were able to create with all the great products we had to work with.
I created a 12 by 12 scrapbook layout using Basic Grey's new Carte Postale paper collection. It's the perfect paper collection to use for all your summer travels. I made a detailed video tutorial on how this project came together, and in it, I show you exactly how, and which products I used (video at the end of this post).
I created a lot of texture using my distressing tool, as well as some the Lindy's Stamp Gang stains, and embossing powders. All the different Glue Dots products I used made the layering of product on my layout much easier, and you'll see what I mean when you watch the video.
Here's what I created:

You can see the color and texture created by the Lindy's Stamp Gang embossing powder, and sprays (the word First was sprayed with Lindy's Stamp Gang Startburst Stain in the color Tibetan Poppy Teal, the word Flight was sprayed with Lindy''s Stamp Gang Flat Fabio in the color Magical Mai Tai, as well as the color Tears on My Pillow Tangerine. Flight was also lightly embossed with Lindy's Stamp Gang's embossing powder in the color Cleopatra's Copper. The journaling you see in the background was printed on my inkjet printer, and embossed with Lindy's Stamp Gang's embossing powder in the color Magic Moon Pearls).
 I cut out many images from the paper collection and layered them as embellishments on the page, using several kids of Glue Dots: mini, XL sheets, lines and pop up 3D dots.
 I also drizzled/dripped some Lindy's Stamp Gang's Startburst Stain in the color Teeth Chattering Teal, in the background of my layout for another layer of texture. You can see the wonderful teal shimmer showing through the white stain, in the picture below.
 I used Basic Grey acrylic stamps from the Hello Collection, to add the date, and design on the small white banner I added towards the bottom of the layout.
 Please watch the video below for more details on how this layout came together. The links to the blogs participating on the blog hop will be listed below the video as well, so go and visit each link so you can take a look at what all the other designers have created, and get in on a sweet giveaway.
Here's the video:
You next stop is Jana's Blog
http://janaeubank.com/
Here is the entire Blog Hop line up, just in case you want to make sure you visit, and comment on each post participating:
Glue Dots Blog
Smitha
Samantha
Erin
Lindy's Stamp Gang Blog
Jessica
Kate
Sharon <<<<<<<<<<<<< YOU ARE HERE
Jana
Kelly
BasicGrey Blog
Thanks for stopping by today!
So happy you can join us today for this super exciting Blog Hop brought to you by Basic Grey, Glue Dots, and Lindy's Stamp Gang products.

I created a 12 by 12 scrapbook layout using Basic Grey's new Carte Postale paper collection. It's the perfect paper collection to use for all your summer travels. I made a detailed video tutorial on how this project came together, and in it, I show you exactly how, and which products I used (video at the end of this post).
I created a lot of texture using my distressing tool, as well as some the Lindy's Stamp Gang stains, and embossing powders. All the different Glue Dots products I used made the layering of product on my layout much easier, and you'll see what I mean when you watch the video.
Here's what I created:

You can see the color and texture created by the Lindy's Stamp Gang embossing powder, and sprays (the word First was sprayed with Lindy's Stamp Gang Startburst Stain in the color Tibetan Poppy Teal, the word Flight was sprayed with Lindy''s Stamp Gang Flat Fabio in the color Magical Mai Tai, as well as the color Tears on My Pillow Tangerine. Flight was also lightly embossed with Lindy's Stamp Gang's embossing powder in the color Cleopatra's Copper. The journaling you see in the background was printed on my inkjet printer, and embossed with Lindy's Stamp Gang's embossing powder in the color Magic Moon Pearls).


Here's the video:
You next stop is Jana's Blog
http://janaeubank.com/
Here is the entire Blog Hop line up, just in case you want to make sure you visit, and comment on each post participating:
Glue Dots Blog
Smitha
Samantha
Erin
Lindy's Stamp Gang Blog
Jessica
Kate
Sharon <<<<<<<<<<<<< YOU ARE HERE
Jana
Kelly
BasicGrey Blog
Thanks for stopping by today!
Monday, July 8, 2013
It's almost the middle of summer already!!!
Hello everyone!
Wow, summer is really a busy time for me! I barely get a chance to stop on by, and sit down to share for a few minutes what I've been up to! Shame, shame I tell you, but hopefully things will go back to normal soon.
I have a huge project I need to undertake in the next couple of months, and that is to go through all my computer's documents, organize, trash, and back up many of my files. It's an intimidating job, but someone's got to do it before something goes terribly wrong, right? I've been going back and forth on the idea for a few month's now, but my time has been so busy lately, I barely even get to touch this computer most days. That's definitely summer for ya! My Emily has been loving going swimming, and she recently started dance classes, so little by little more stuff has been added to my schedule. She's growing up so fast!
I don't want to leave you today without sharing a project. I made this card a while ago, but for some reason I can't seem to recall blogging about it here, so this is the perfect time to share. I used one of Sweet Nothing's Stamp Co. stamps for it, and I love the simplicity of it. I colored her using my Copic Markers and I used some Prima paper on it.
I hope you like it, and I look forward to sharing with you many new projects and tutorials soon. In the meantime, I hope you are enjoying the summer with your family, and making the best out of the hot weather. Stay tuned!

Tuesday, June 25, 2013
A Mermaid's Summer Tag 2013
Its summer time, and I don't know about you, but I am enjoying mine very much so far. Summer is all about fun, beach, water, and hot weather.
Hello everyone!
I know I've been gone for a few weeks, but I've been on vacation, and I've just got back. I've been enjoying my summer so far, and I wanted to share with you a summery tag I created using Mermaid Sophie, from Sweet Nothings Stamp Co. She looks too cute sitting by the water, I could not wait to color her.
 Like always, I colored her using my Copic Markers and I added some distress, as well as regular Stickles to her tail, for a little bit more dimension, and shine. I used some felt clouds from Katscrappiness.com as well as some die cuts I made using a grass Impression Obsession die.
I totally got out all my fiber, and added quite a bit of it to the top of the tag, because I always like adding fibers to my tags.
The background, I embossed using a Cuttlebug folder, and I used paper by Echo Park, from last year's Summer Collection in the background of the tag. A touch of a few real mini shells finished off the tag, and I really like how it turned out. Do you? The banner I cut freehand and added a sentiment from one of those dollar stamps from Michael's or Joann's---Inkadinkado I believe is the brand.
I hope you enjoyed this project, and give Mermaid Sophie a try. She's really fun to color with her long hair.
Hope you enjoy your summer!
Hello everyone!
I know I've been gone for a few weeks, but I've been on vacation, and I've just got back. I've been enjoying my summer so far, and I wanted to share with you a summery tag I created using Mermaid Sophie, from Sweet Nothings Stamp Co. She looks too cute sitting by the water, I could not wait to color her.

I totally got out all my fiber, and added quite a bit of it to the top of the tag, because I always like adding fibers to my tags.
The background, I embossed using a Cuttlebug folder, and I used paper by Echo Park, from last year's Summer Collection in the background of the tag. A touch of a few real mini shells finished off the tag, and I really like how it turned out. Do you? The banner I cut freehand and added a sentiment from one of those dollar stamps from Michael's or Joann's---Inkadinkado I believe is the brand.
I hope you enjoyed this project, and give Mermaid Sophie a try. She's really fun to color with her long hair.
Hope you enjoy your summer!
Wednesday, May 22, 2013
Mixed Media Canvas: Prima & Lindy's Stamp Gang
Hi everybody!
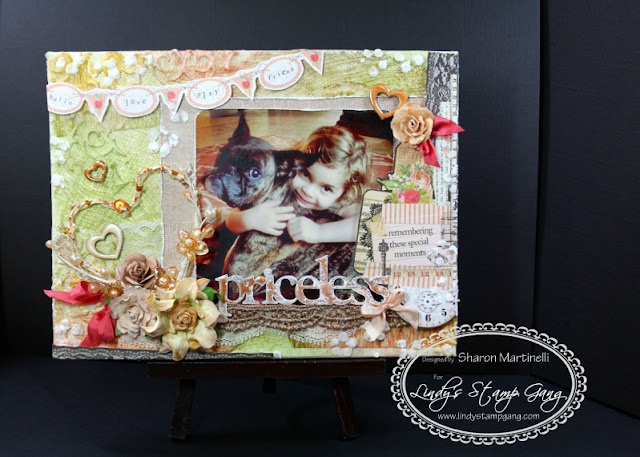
Today I'm sharing with you a canvas I created using Prima Products, as well as Lindy's Stamp Gang Products. For those of you who love tutorials, I'll be uploading a complete tutorial on how I created it, this coming Friday, May 24th, so stay tuned for that.
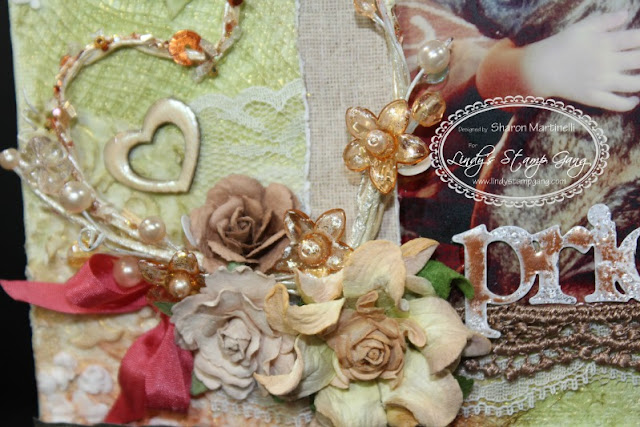
I used Prima's Lyric Collection, as well as some of their stencils, flowers, trim, and more. For color, I used tons of Lindy's Stamp Gang products. Please see the list, and links to all of them at the end of this post, and remember, stay tuned for the video coming up in a few days! I hope you like it.

Today I'm sharing with you a canvas I created using Prima Products, as well as Lindy's Stamp Gang Products. For those of you who love tutorials, I'll be uploading a complete tutorial on how I created it, this coming Friday, May 24th, so stay tuned for that.
I used Prima's Lyric Collection, as well as some of their stencils, flowers, trim, and more. For color, I used tons of Lindy's Stamp Gang products. Please see the list, and links to all of them at the end of this post, and remember, stay tuned for the video coming up in a few days! I hope you like it.


Lindy's Stamp Gang products used:
Starburst Stain in Golden Sleigh Bells
Flat Fabio in South Shore Sand
Flat Fabio in Aloha Avocado
Flat Fabio in Kissin Kenickie Coral
Glitz Spritz in Blazing Sun
Embossing Powders in Magic Moon Pearls and Byzantine Bronze
Monday, May 20, 2013
Faber Castell Design Memory Craft Tutorial #4
Happy Monday friends!
Today I wanted to share with you a video tutorial on how I created this artsy tag, using Faber Castell Design Memory Crafts products. Enjoy!


For more information, techniques and ideas on these, and other Faber-Castell Design Memory Craft products, please check out the links below:
Website: http://www.designmemorycraft.com
Pinterest: http://pinterest.com/designmemcraft
Wednesday, May 15, 2013
Repurposing!
Hello everyone!
Today I wanted to share a little tutorial on how to repurpose the containers of candles. If you follow me on Instagram, you already know that I'm addicted to candles for my home, and my favorite seem to be the three wick candles from Bath and Body Works. I go through those all the time, and hate throwing the container away, because they are so pretty, and I know they could be used for other things after I've burnt through the candles. I have to be honest, and tell you I don't repurpose all of mine, since I use many of these a year, and don't need a house full of glass containers lol. However, from time to time I do repurpose them, and here's a picture tutorial on what I do to get them looking perfect, and ready for their new way of use.
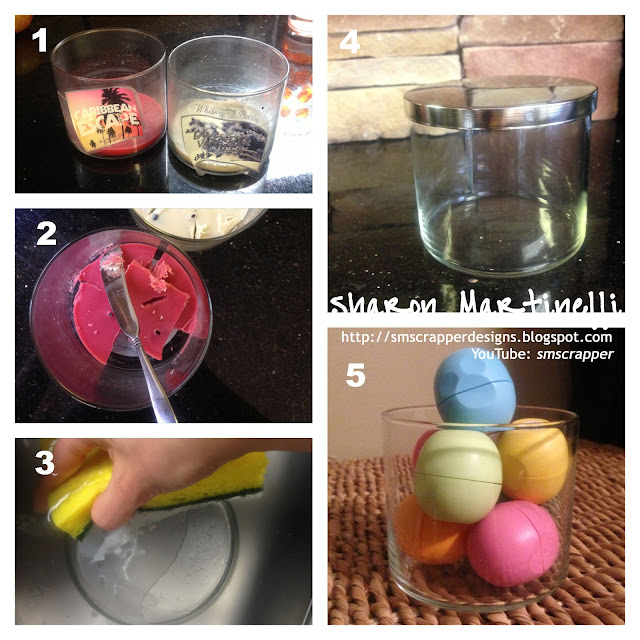 1. Take your burnt candle holder container, and remove all the stickers you can take off the glass. Put the container in your freezer for about twenty minutes. The cold temperature will make the leftover wax shrink and firm up.
2. Take the container out of the freezer, and gently with a knife, break the wax and take it all out, as well as the three metal wick holders in the bottom of the container.
3. With a nice sponge, wash out the container, and get rid of any stickiness you have left in the bottom, or side of the jar. If you have issues removing the adhesive of the stickers, just spray the glass with Goo Gone, and it will come totally clean. Rinse well.
4. Let air dry, and that's it! Your container is ready to be repurposed.
5. I use my clean containers to hold small things, such as lipsticks, lip gloss as you see in the picture, candy, even nail polish! You can definitely embellish (or not) your container if you like, and use it in your craft area too. The possibilities are endless!
I hope you enjoyed this quick and simple tutorial. A different post from my usual paper crafting posts. I hope it is useful to you.
Thanks for stopping by!
Subscribe to:
Posts (Atom)